
Task 1 : Setting Up the Client and Resource Server
In this step, we will configure the essential components on the F5 BIG-IP system to enable the client application to communicate with the preconfigured Authorization Server. These configurations establish the foundational elements required for secure authentication and authorization, ensuring that access to the application is granted only to authenticated users.
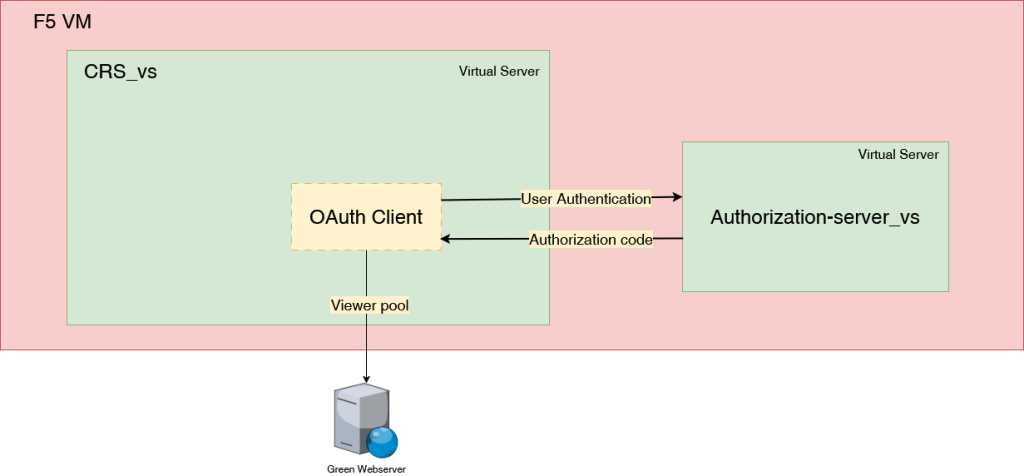
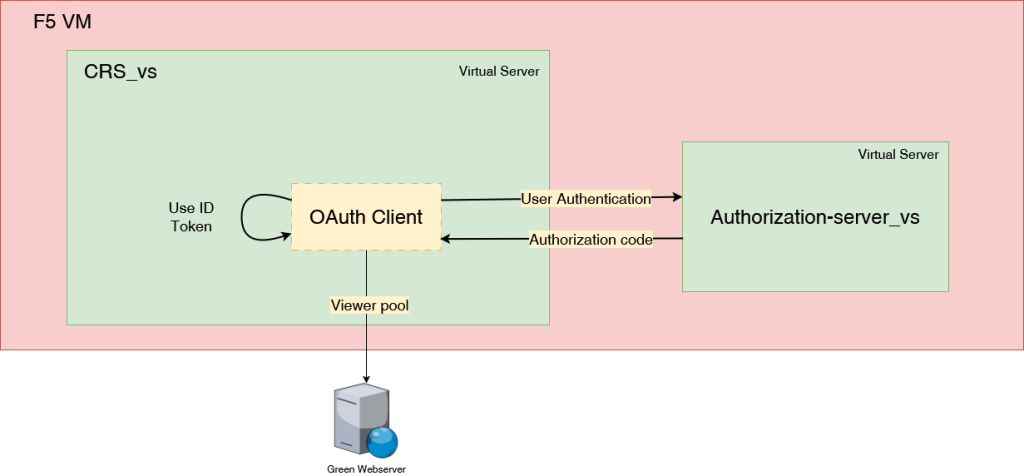
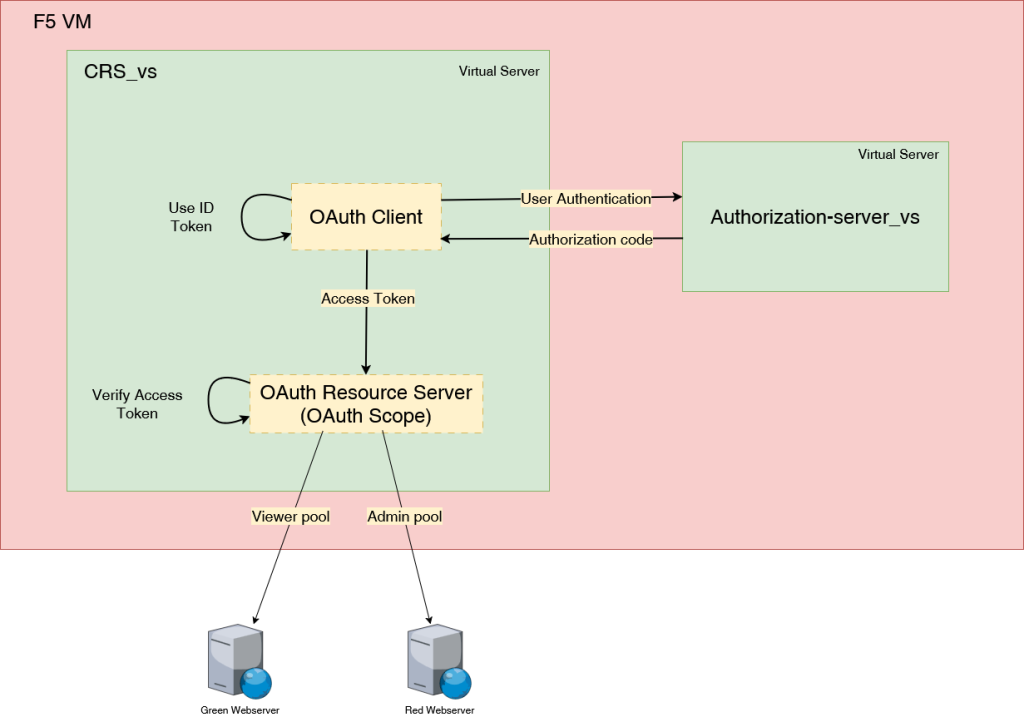
We will create the CRS_vs virtual server (192.168.110.101:443), which will act as the OpenID Connect Client to authenticate users against the Authorization-server_vs virtual server (192.168.110.100:443). At this stage, any authenticated user will be granted access to the resource, which is represented by the viewer pool. Here is below the user that are registered on the Authentication server :
| Username | Given Name | Pseudo | Privilege |
|---|---|---|---|
| kevin | Kevin | RobbersNightmare | viewer |
| nicolas | Nicolas | F5Enjoyer | admin |
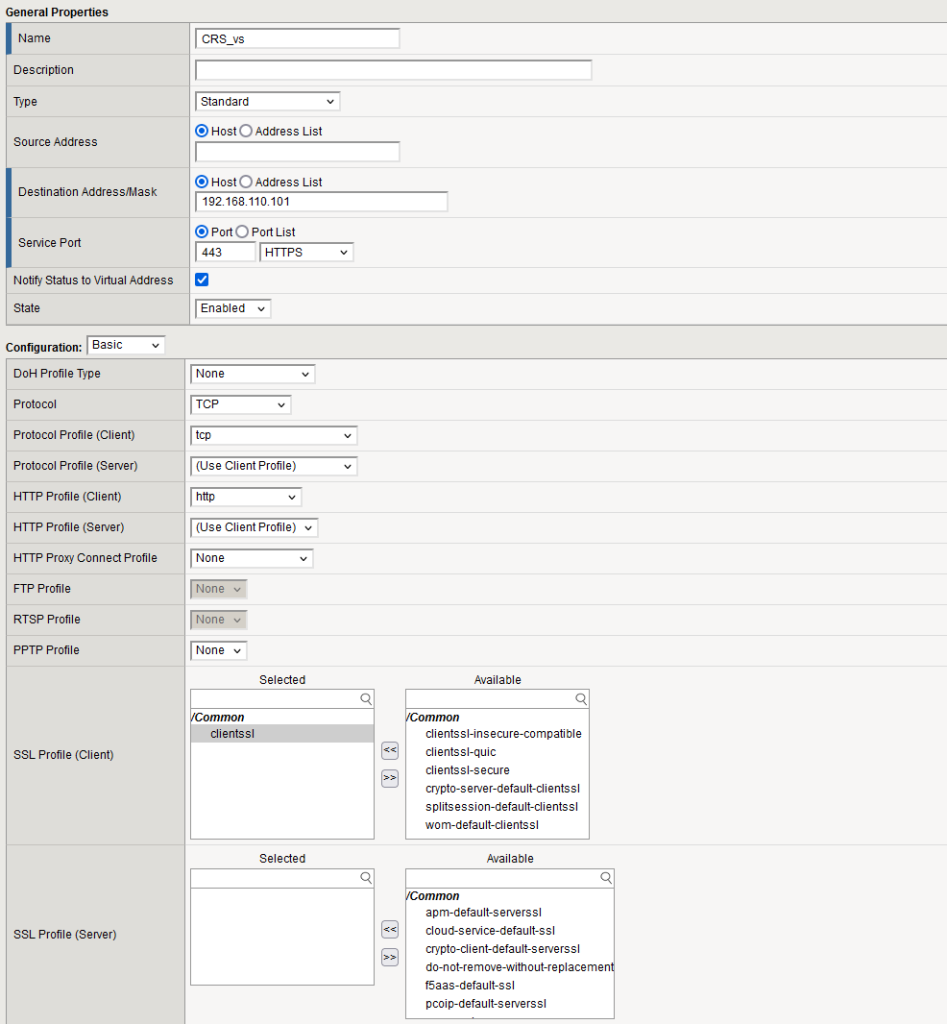
Create the CRS_vs virtual server with the IP address 192.168.110.101, configured to listen on port 443. Ensure that you attach an HTTP profile and the default SSL client profile.
Client Application
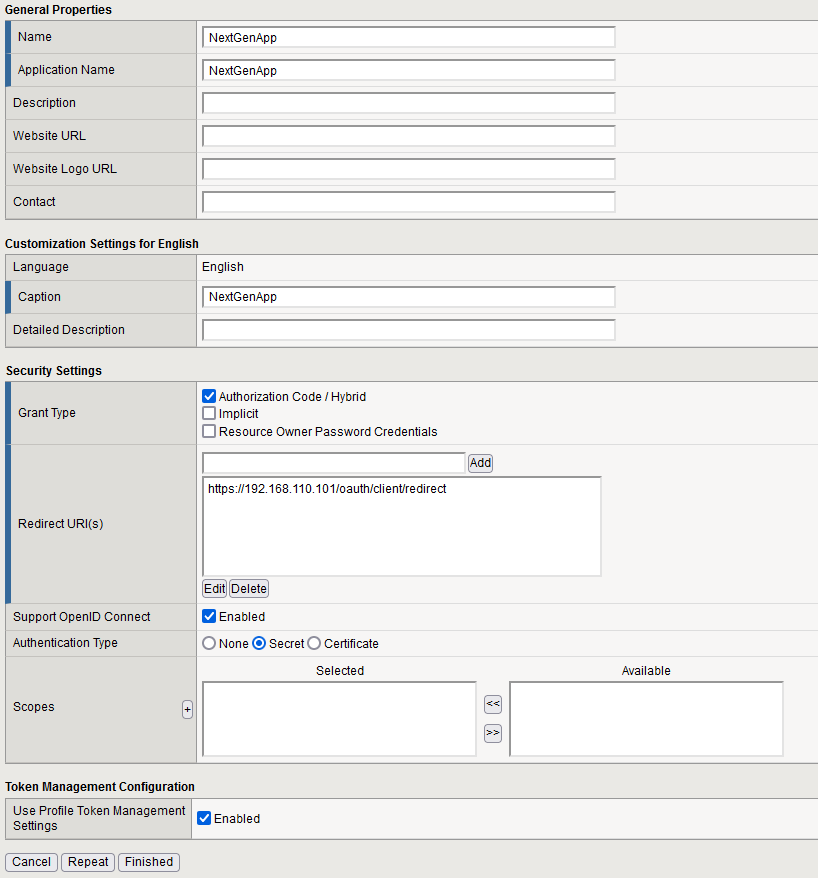
Create the NextGenApp client application by navigating to Access ›› Federation ›› OAuth Authorization Server ›› Client Application.
- Set the Grant Type to Authorization Code / Hybrid.
- Add a redirect URL pointing to your
CRS_vsvirtual server: https://192.168.110.101/oauth/client/redirect - Check the box to Enable OpenID Connect to ensure OpenID functionality is activated.
Resource Server
Create the NextGenRS resource server by navigating to Access ›› Federation ›› OAuth Authorization Server ›› Resource Server.
- Set the Name to NextGenRS.
- Select Secret as the Authentication Type

OAuth Profile
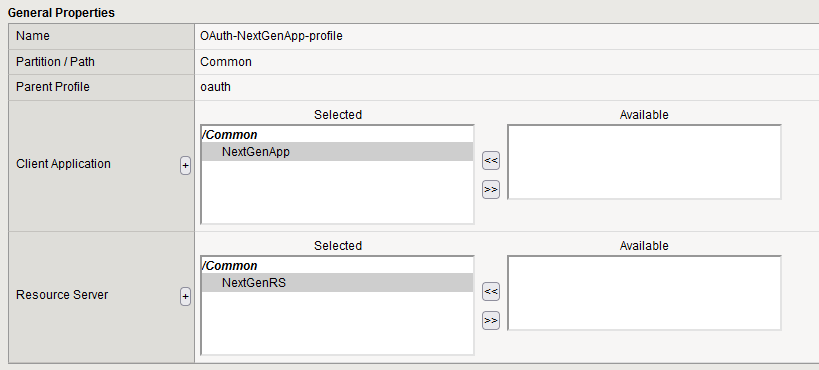
Integrate the newly created application and resource server into the OAuth profile. Navigate to Access ›› Federation ›› OAuth Authorization Server ›› OAuth Profile :
- Open the profile OAuth-NextGenApp-profile.
- Add the previously configured NextGenApp client application and NextGenRS resource server to this profile
JWT Key
We aim to use JWT (JSON Web Token) for its simplicity and efficiency.
- In the OAuth Profile, enable Support JWT Token and Support OpenID Connect by ticking their respective checkboxes.
- Notice that a JWT key is required for the configuration.
- Exit the OAuth Profile setup to configure the necessary JWT key before proceeding.
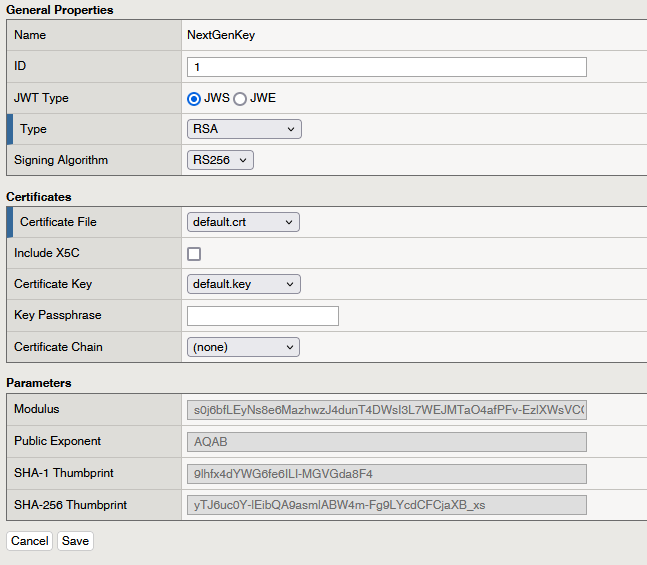
Navigate to Access ›› Federation ›› JSON Web Token ›› Key Configuration to create a new JWT Key.
- Although the ID is not marked as mandatory, it is necessary to provide an ID for proper functionality. In this case, use ID 1.
- Select RSA as the key Type.
- Set the Signing Algorithm to RS256.
- Choose the default certificate for both the certificate file and key to complete the key configuration.
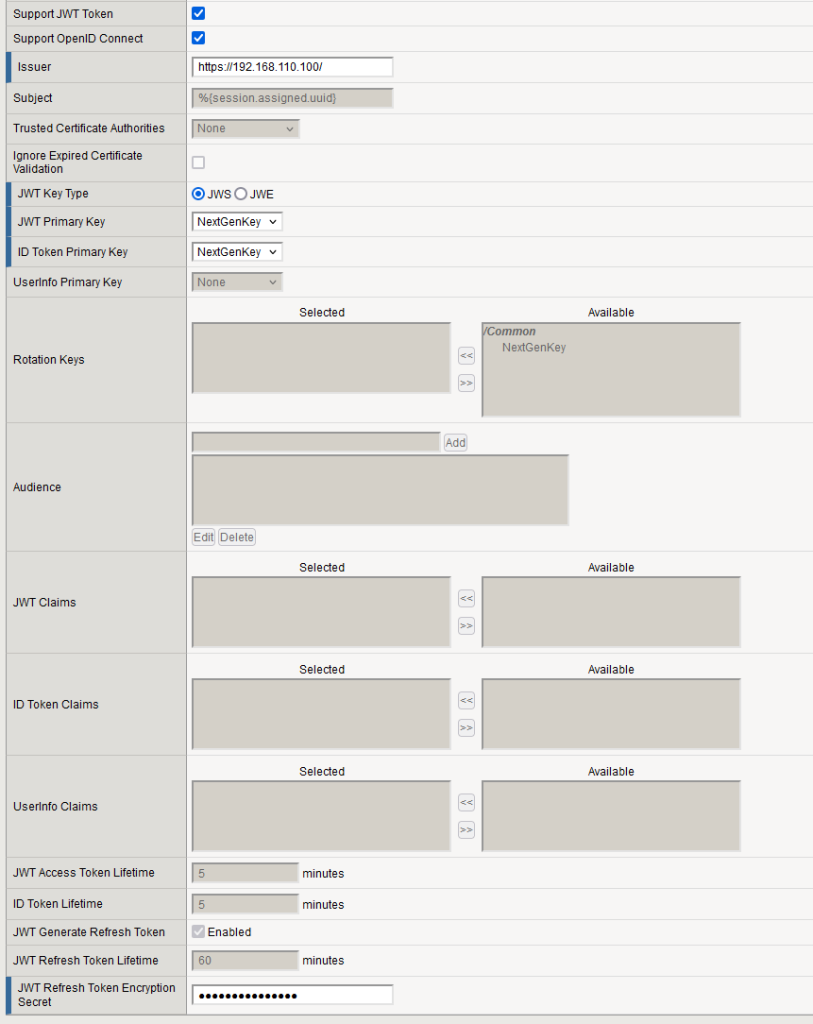
Return to the OAuth Profile by navigating to Access ›› Federation ›› OAuth Authorization Server ›› OAuth Profile.
- Enable Support JWT Token and Support OpenID Connect by checking their respective boxes.
- In the Issuer field, enter the URL of the Authorization Server, which in this case is https://192.168.110.100/.
- For the JWT Key Type, select JWS.
- In the JWT Primary Key field, select NextGenAppKey.
- Set the ID Token Primary Key to NextGenAppKey as well.
- For JWT Refresh Token Encryption Secret, enter a password; in this example, use NextGenPassword.
JSON Web Token
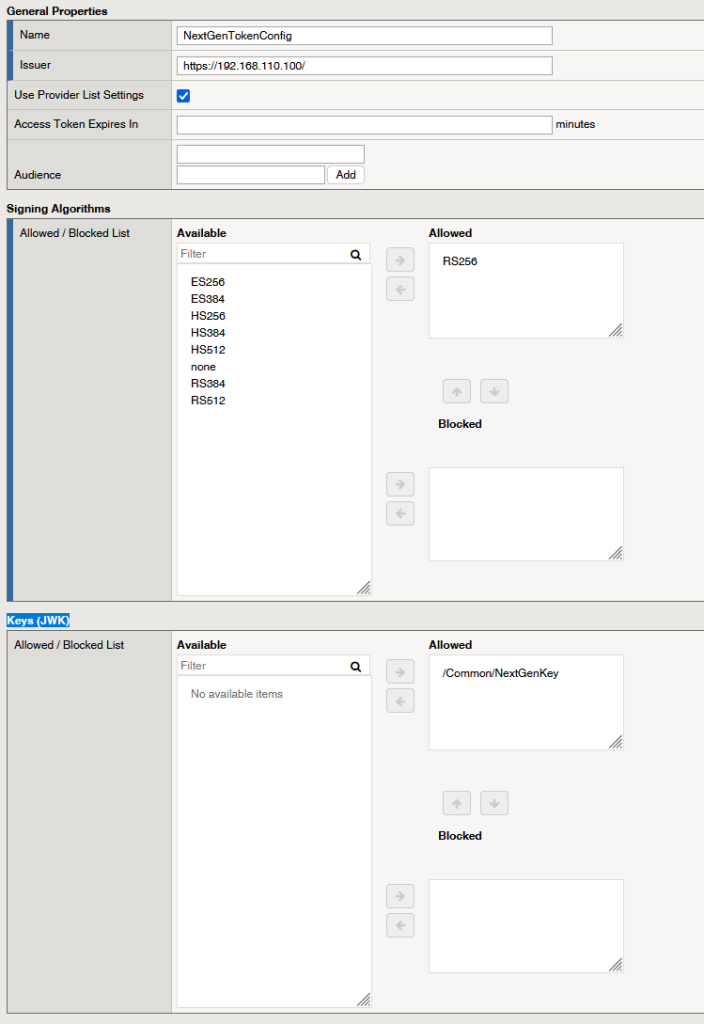
Create a JSON Web Token profile by navigating to Access ›› Federation ›› JSON Web Token ›› Token Configuration.
- Create a new JWT profile named NextGenTokenConfig.
- In the Issuer field, specify the URL of the Authorization Server, which is https://192.168.110.100/.
- Under Allowed Signing Algorithms, select RS256 to enable it for the profile.
- For the Keys (JWK), move the /common/NextGenKey to the allowed part.
OAuth Provider
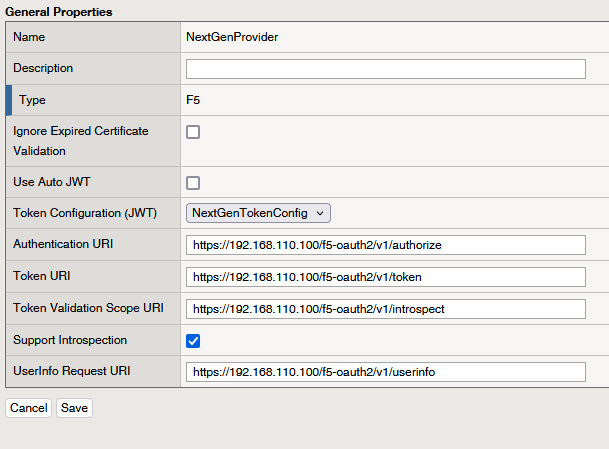
Create an OAuth Provider by navigating to Access ›› Federation ›› OAuth Client / Resource Server ›› Provider.
- Set the Name to NextGenAppProvider and select the Type as F5.
- Untick the Use Auto JWT box to manually select the Token Configuration (JWT) profile. Choose NextGenTokenConfig from the available options.
- Configure the following URIs:
- Authentication URI:
https://192.168.110.100/f5-oauth2/v1/authorize - Token URI:
https://192.168.110.100/f5-oauth2/v1/token - Token Validation Scope URI:
https://192.168.110.100/f5-oauth2/v1/introspect - UserInfo Request URI:
https://192.168.110.100/f5-oauth2/v1/userinfo.
- Authentication URI:
OAuth Server
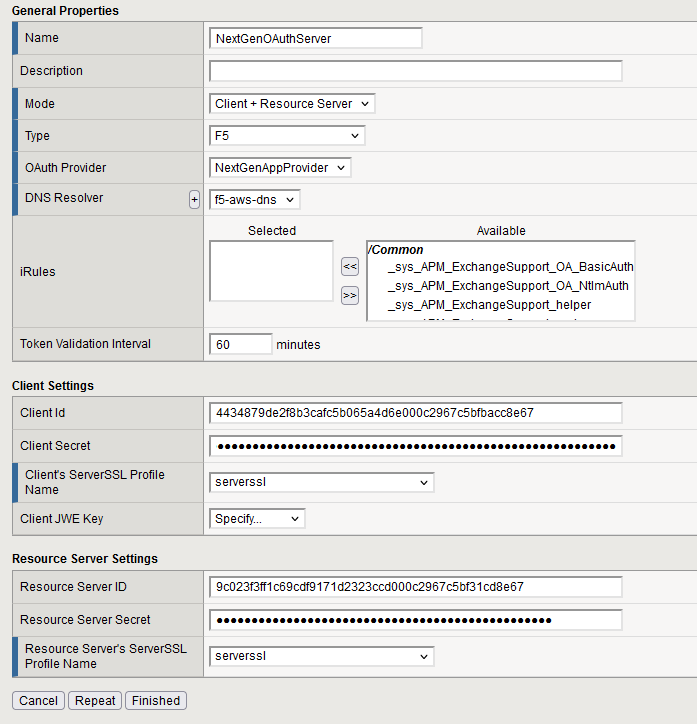
Navigate to Access ›› Federation ›› OAuth Client / Resource Server ›› OAuth Server to create the OAuth Server profile.
- Name the profile NextGenOAuthServer and select Client + Resource Server mode.
- Set the Type to F5 and select the DNS Resolver as default f5-aws-dns.
- Choose the default client and SSL server profile.
- Enter the Client ID and Client Secret. These can be found in the OAuth Client configuration.
- Input the Resource Server ID and Resource Server Password, which can be found in the respective OAuth Resource Server profile.
APM Policy
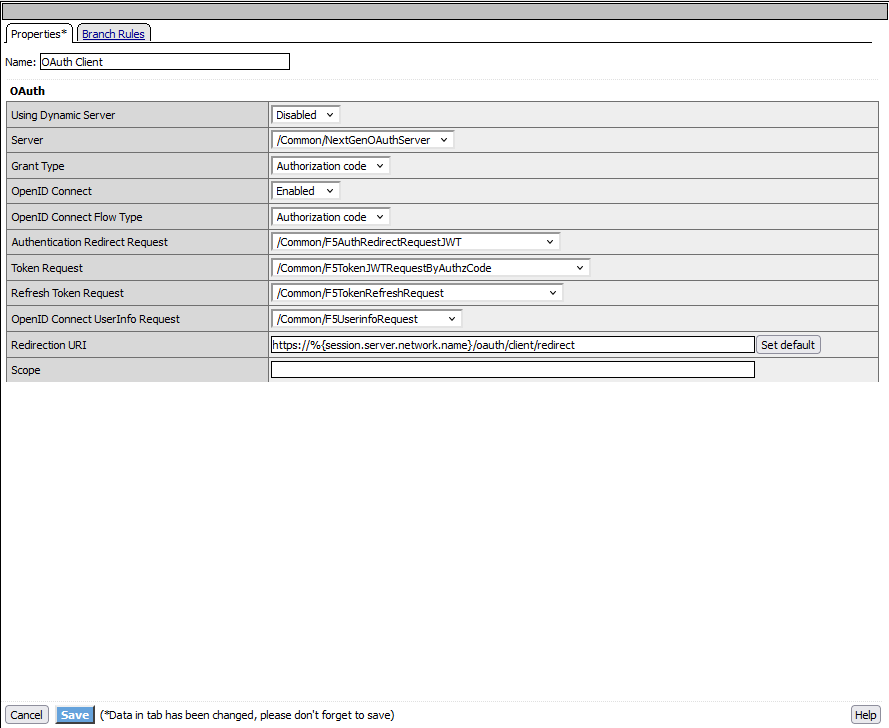
Create an APM policy named CRS_policy. This policy will act as both the client and the resource server (but in this step only as a client). In the Visual Policy Editor (VPE), add the OAuth Client box to simulate the client interaction with the authorization server :
- For the OAuth Client box, select the NextGenOAuthServer under the Server dropdown.
- Ensure OpenID Connect is enabled by ticking the respective checkbox.
- For Authentication Redirect Request, select F5AuthRedirectRequestJWT.
- In the Token Request, choose F5TokenJWTRequestByAuthzCode to handle the token exchange with the authorization code flow.
- Finally, for the Refresh Token Request, select F5TokenRefreshRequest to enable token refresh functionality.
- For the OpenID Connect UserInfo Request, choose F5UserInfoRequest.
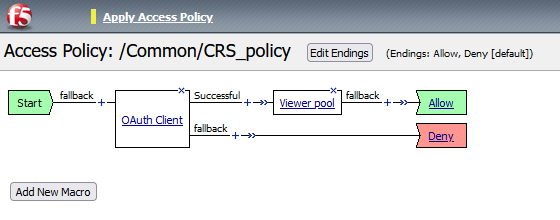
Once the OAuth client configuration is complete, proceed as follows:
- In the Success Branch, add a Pool Assign action and assign the Viewer Pool to the successful authentication flow.
- Ensure that you include an Allow action in the ending.
- Your Visual Policy Editor (VPE) should now reflect the following flow:
- OAuth Client box for client-side OAuth configuration.
- Success Branch connected to the Pool Assign action, where the Viewer Pool is assigned.
- Allow Branch connected to the Allow action to finalize the access.
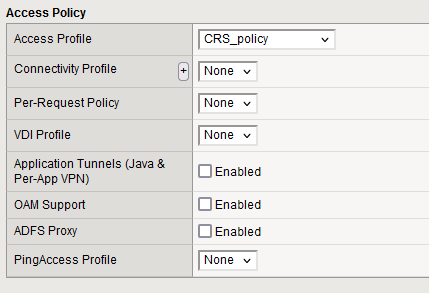
Assign you newly created policy, CRS_policy, to the CRS_vs virtual server.
If everything is configured as intended, you are now able to authenticate against the Authorization Server using OpenidConnect before gaining access to the application.
Steps to Test Authentication and Access
- Open the WebViewer VM: Launch the WebViewer VM to simulate user access.
- Access the Application: Open a web browser and navigate to the URL
https://192.168.110.101.- The application should redirect you to the Authorization Server for authentication.
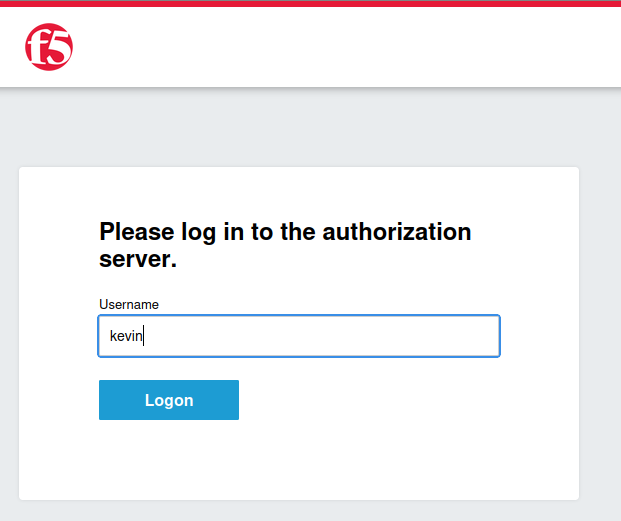
- Login:
- Use the credentials of either:
- Username:
kevin– A simple user with viewer privileges. - Username:
nicolas– An admin user with admin privileges.
- Username:
- Use the credentials of either:
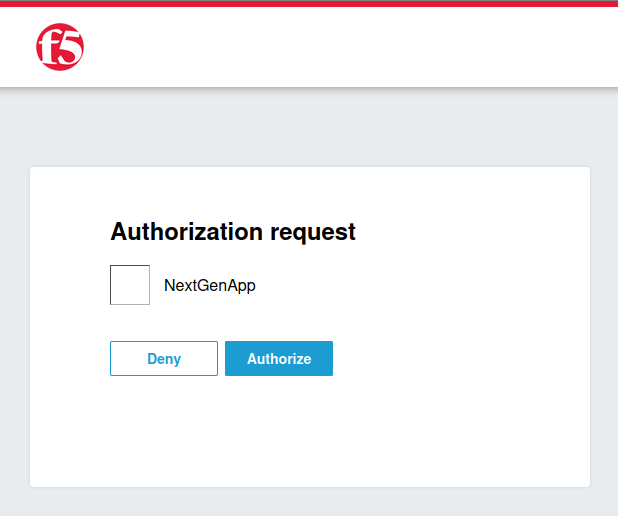
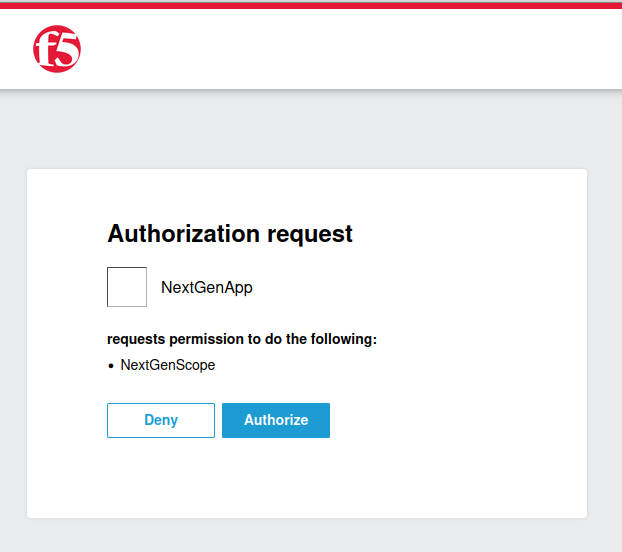
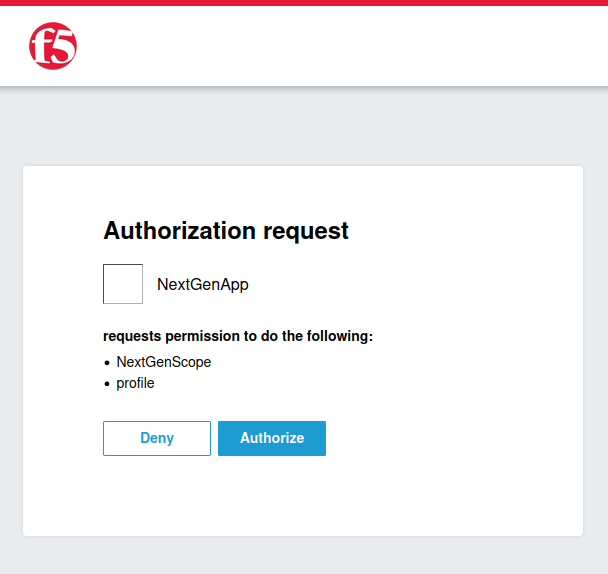
Grant consent to allow the application to access your information from the Authorization Server. This step will become more significant in the upcoming tasks :
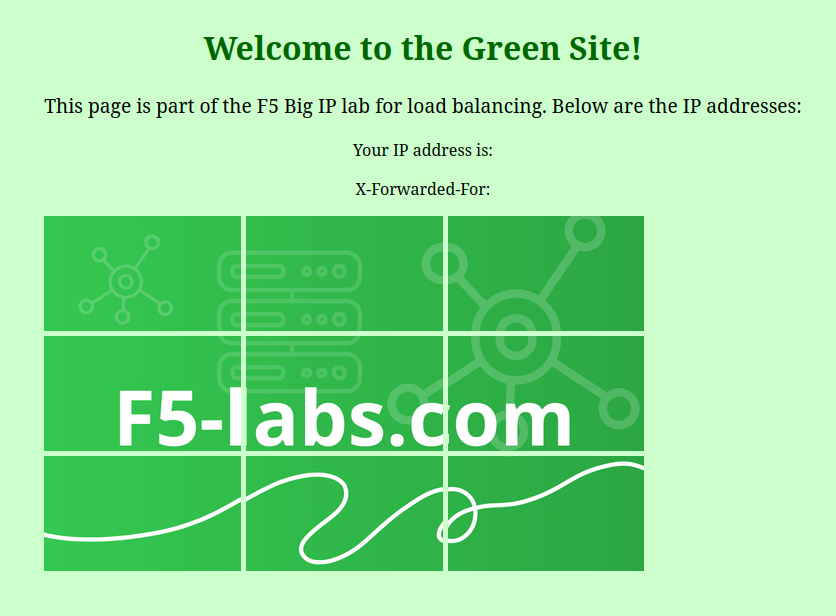
Verify Access:
- Upon successful login, you should gain access to the backend server (green server), which serves as the viewer pool for authenticated users.
Task 2 : Utilizing Authenticated User Information in the Application
The client is correctly configured to authenticate users against the Authorization Server before granting access to the application. However, while authentication ensures secure access, the application does not yet utilize any of the authenticated user information, such as the username or other info.
The application owner has requested that you retrieve the authenticated user’s name to enhance the user experience. The goal is to display a personalized welcome message box featuring the user’s name before granting access to the application.
What piece of object should you create to pass the given name of the user through the token id ?
User information is transferred to the client via the ID token using claims and scopes. Scopes define a set of claims representing specific user data. By including the appropriate scope and ensuring the given_name claim is configured within that scope, the user’s given name can be passed through the ID token for use by the application.
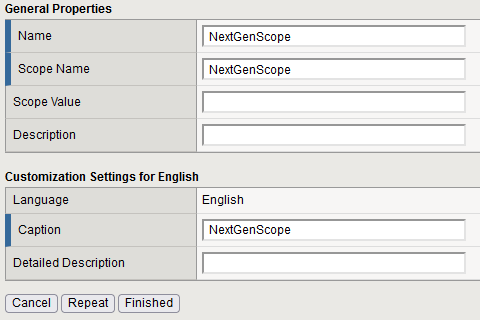
Create a custom scope for user information:
Navigate to Access ›› Federation : OAuth Authorization Server : Scope and create a new scope named NextGenScope.
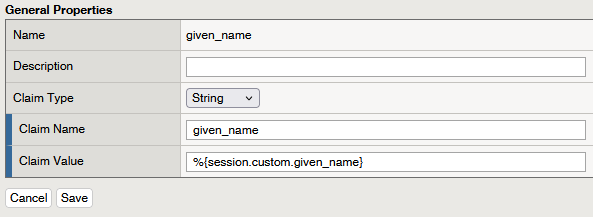
Create a Claim for the User’s Given Name
- Navigate to:
Go to Access ›› Federation : OAuth Authorization Server : Claim. - Create a New Claim:
- Name the claim given_name.
- Set its value to %{session.custom.given_name}.
The value of this claim is derived from a custom variable configured in the authorization server’s policy. This variable is used to store the given name of the authenticated user, ensuring that the specific user’s information can be included in the token or UserInfo response.
In a production environment, user attributes like the given name are typically retrieved directly from an external directory, such as Active Directory or an LDAP server
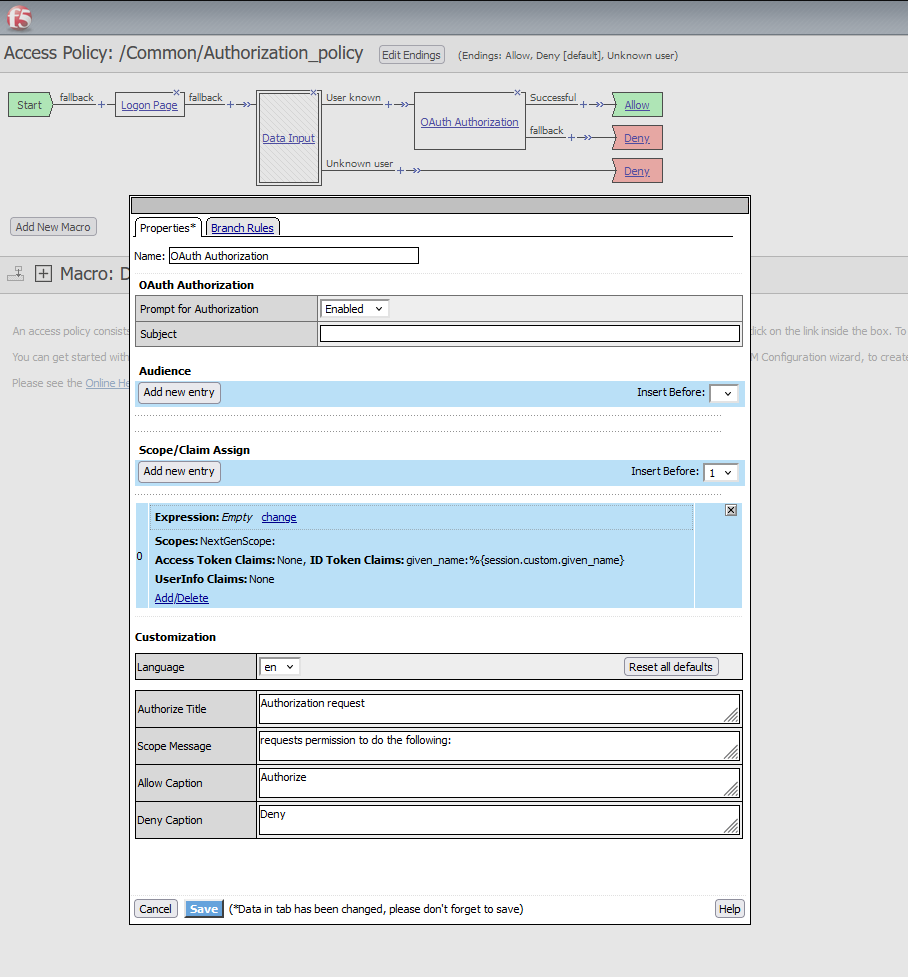
Add the Custom Scope and Claim to the Authorization Policy
- Navigate to the Authorization Policy:
Go to Access ›› Profiles / Policies : Access Profiles (Per-Session Policies) and edit the Authorization_policy. - Add the Scope and Claim:
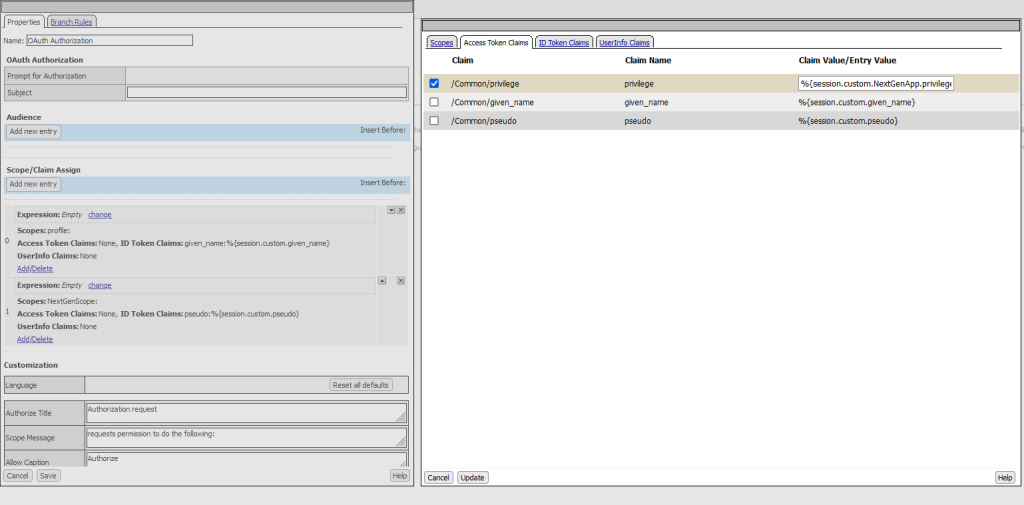
- In the OAuth Authorization box, click to add a new scope/claim mapping.
- The expression field should remain empty to allow the retrieval of the scope and claim during every authentication request.
- Select NextGenScope as the scope.
- Add given_name as the ID Token claim.
Now that the Authorization Server sends the given_name claim inside the ID token, we can proceed to display this personalized information in the client policy.
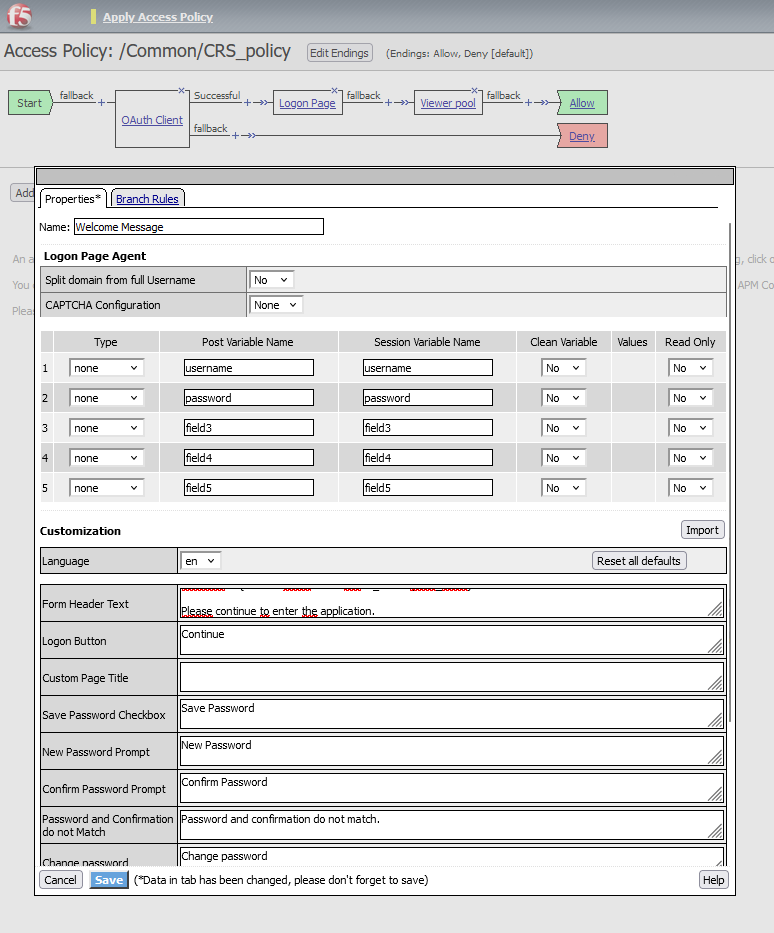
- Open the Client Policy:
Navigate to Access ›› Profiles / Policies : Access Profiles (Per-Session Policies) and open the CRS_policy. - Add the Logon Page Element:
- In the Visual Policy Editor (VPE), locate the Success branch of the OAuth Client box.
- Add a Logon Page element into the Success branch. The Logon Page will be used to display the personalized message, without requiring any user input.
- Configure the Logon Page:
- Set all fields as None (no input fields) since we don’t want to collect any user input at this point.
- In the Form Header Text field, enter the following HTML message: Welcome %{session.oauth.client.last.id_token.given_name}! Please continue to enter the application.
- This will dynamically display the user’s given_name based on the information in the ID token.
- Customize the Logon Button:
- Set the Logon Button Text to Continue.
Access application with the WebViewer VM. Does the welcome message display ? Is the given name of the user displayed ? Why ?
Using the Web Viewer VM, we can observe that the authentication process works as expected. The authorization server requests consent for the NextGenScope.
The user is then redirected back to the application, but the given name is missing from the welcome message.
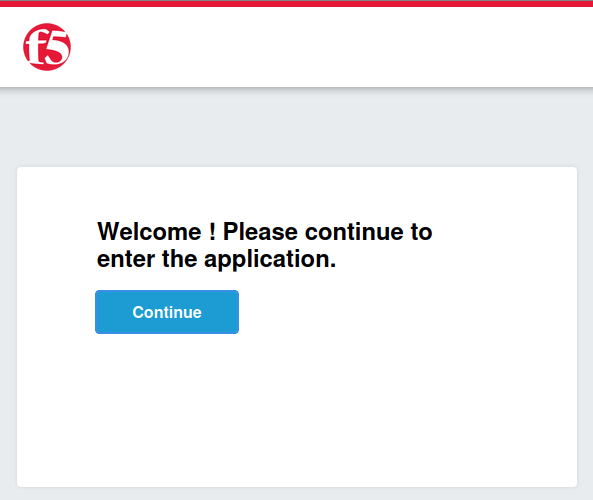
This occurs because we used the reserved claim “given_name,” which is only valid within the “profile” scope (a pre-reserved scope). For a comprehensive list of reserved claims and their associated scopes, refer to the documentation here: Okta OpenID Connect Overview. Since the “profile” scope was not requested, the claim is not returned.
We saw that we cannot use a reserved claim inside a custom scope. To address this, we will create a new custom claim, “pseudo,” that will hold the pseudonym the user wants to use within the NextGenApp.
- Create a new scope named profile.
- Create a new claim named pseudo, use a value of %{session.custom.pseudo}
Next, navigate to Access ›› Profiles / Policies : Access Profiles (Per-Session Policies) and edit the Authorization_policy.
- Inside the OAuth Authorization box, create a new scope mapping with profile and associate it with the ID Token Claims such as given_name.
- Modify the original claim mapping by removing the given_name claim and adding the new custom claim pseudo for the NextGenScope.
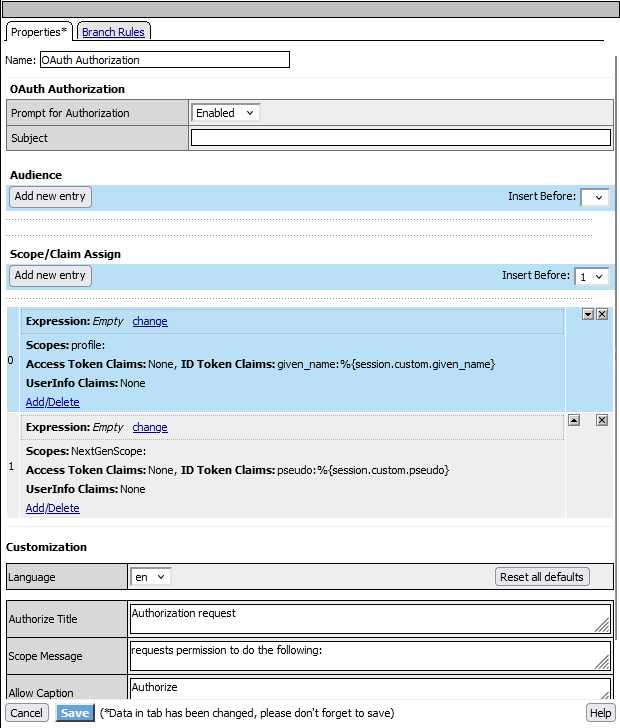
Ensure that you create two distinct mappings: one that maps the given_name claim to the profile scope, and another that maps the pseudo claim to the NextGenScope.
Next, go to Access ›› Profiles / Policies : Access Profiles (Per-Session Policies) and edit the CRS_policy.
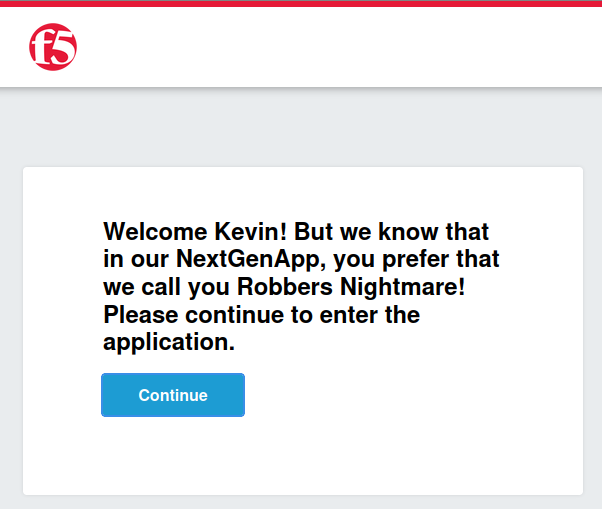
- Edit the logon page and modify the message to: “Welcome %{session.oauth.client.last.id_token.given_name}! But we know that in our NextGenApp, you prefer that we call you %{session.oauth.client.last.id_token.pseudo}! Please continue to enter the application.”
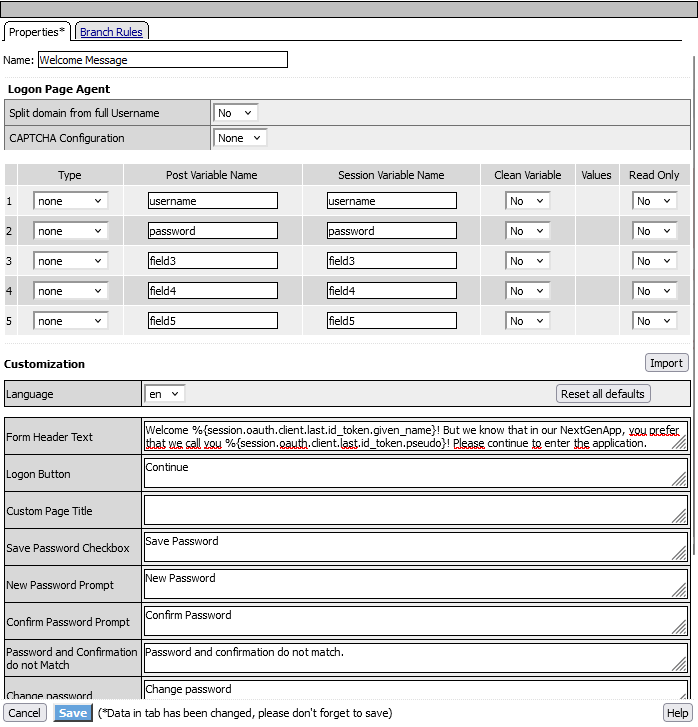
This update will display the user’s given_name first, followed by their pseudo to personalize the welcome message according to their preferences.
Using the Web Viewer VM, access the CRS virtual server. The authorization server now ask consent for profile and NextGenScope :
The welcome message now correctly displays the user’s information, showing their given_name followed by the pseudo. This confirms that the custom claim mapping is functioning as expected, providing a personalized welcome message in the NextGenApp.
Task 3 : Accessing the NextGenApp with an Access Token
Up to this point, we have implemented the OpenID Connect standard to authenticate users before granting them access to a client application, ensuring that only authenticated users can interact with the application. However, without the use of an Access Token, any client could access the application, bypassing authorization controls.
In this new task, we will extend the functionality by utilizing the OAuth 2.0 framework to manage authorization. This is achieved through the use of Access Tokens, which serve as proof of authorization. The Access Token will be presented to a resource server to gain access to a specific resource—in our case, the backend server—where access to resources is determined based on user privileges.
For example, a user with the “viewer” privilege will be granted access to the viewer pool, which is connected to the green web server, whereas a user with the “admin” privilege will be granted access to the admin pool, which is connected to the red web server.
Create a new privilege claim
Let’s create a new claim that will contain the privilege level of the user for the NextGenApp. To do so:
- Navigate to Access ›› Federation : OAuth Authorization Server : Claim.
- Create a new claim named privilege.
- Set the value to
%{session.custom.NextGenApp.privilege}.
Claim mapping
Add the new claim to the claim mapping inside the policy :
- Navigate to Access ›› Profiles / Policies : Access Profiles (Per-Session Policies) and select the Authorization_policy.
- Inside the OAuth Authorization box, locate the claim mapping associated with the NextGenApp scope.
- Add the new privilege claim inside the Access Token Claim section.
Authenticated users now receive an access token, which serves as proof of their authorization to access the application. However, it’s important to note that authentication alone doesn’t automatically grant access. A user can be authenticated but not authorized, meaning that a specific access token might not be assigned to them, thus preventing access. This authorization process can be handled using expressions to assign scopes and claims. In our example, all authenticated users receive an access token, but with different values. Fine-grained access control is achieved by evaluating the privilege claim, which determines if the user is a viewer or an admin. Based on this evaluation, the user is then directed to the appropriate backend server.
Upgrade the CRS policy to act as a resource server
Until now, the CRS policy has only acted as a client. To also enable it to act as a resource server, we will use the OAuth Scope box inside the Visual Policy Editor (VPE). This box will perform two key functions:
- It will verify that the access token is valid.
- It will decode the token, allowing us to examine its contents, such as the presence and value of the privilege claim.
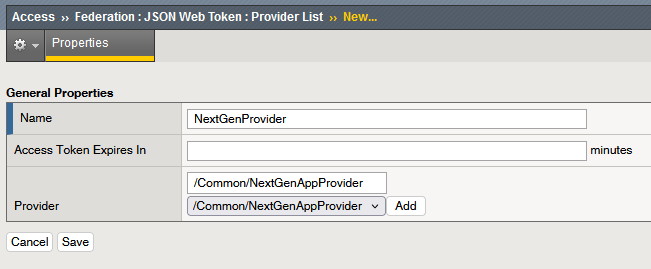
First, create the JWT provider by going to Access ›› Federation : JSON Web Token : Provider List. Name it NextGenProvider and select the NextGenAppProvider :
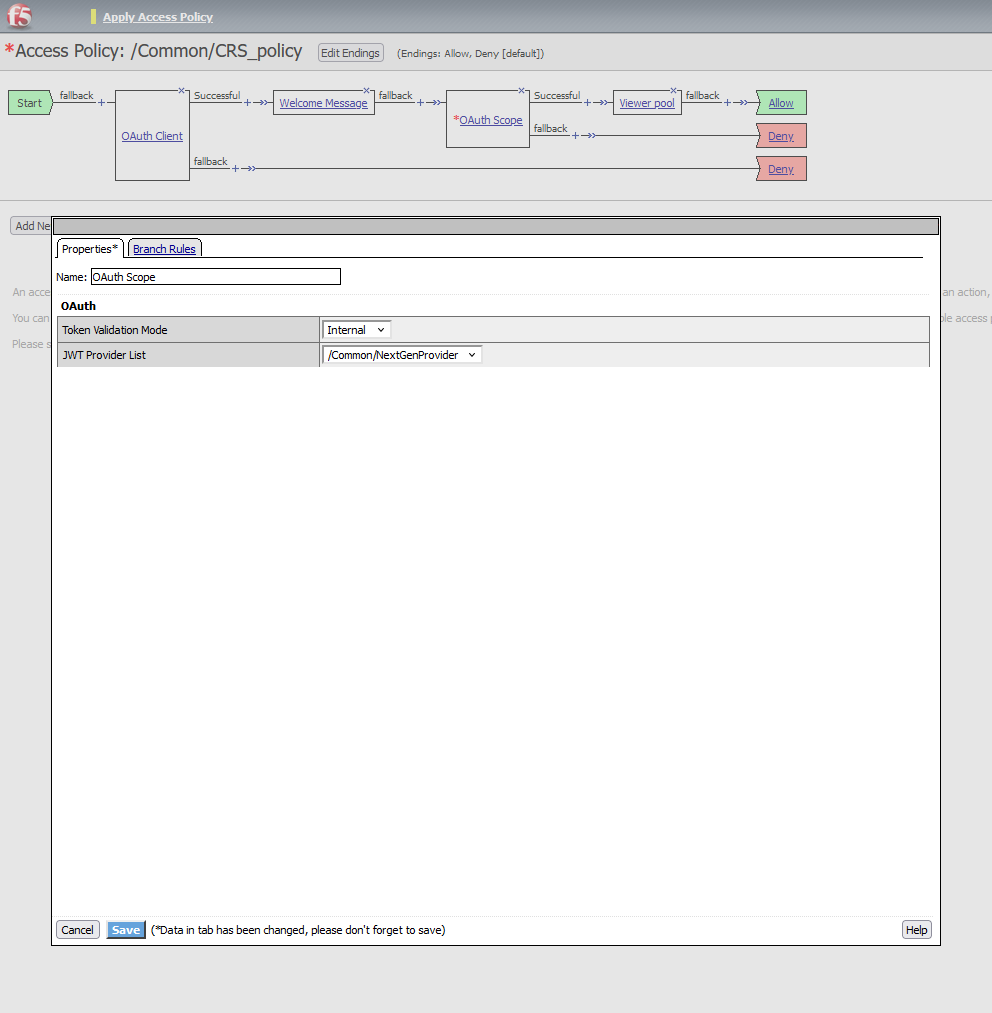
Now, we can add the OAuth Scope box :
- Go to Access ›› Profiles / Policies : Access Profiles (Per-Session Policies) and open CRS_policy.
- After the welcome message, add the OAuth Scope box.
- In the OAuth Scope settings, select internal validation mode and the JWT Provider List that was previously created.
Now that the OAuth Scope box has been added, new session variables are available under session.oauth.scope.last.jwt. For instance, we can verify that the user has correctly presented an access token containing the privilege claim and its value.
To achieve this:
Add a Logon Page
- Place a Logon Page immediately after the OAuth Scope box.
- Set all fields to None as no user input is required.
- In the Form Header Text, enter the following message:
"Your privilege is %{session.oauth.scope.last.jwt.privilege}!"

Add a Decision Point
- After the Logon Page, add an Empty Box to create a decision point based on the privilege value.
Create Branches
- Create two branches from the decision point with the following expressions:
- For viewers:
- expr { [mcget {session.oauth.scope.last.jwt.privilege}] eq “viewer” }
- For admins :
- expr { [mcget {session.oauth.scope.last.jwt.privilege}] eq “admin” }
- For viewers:
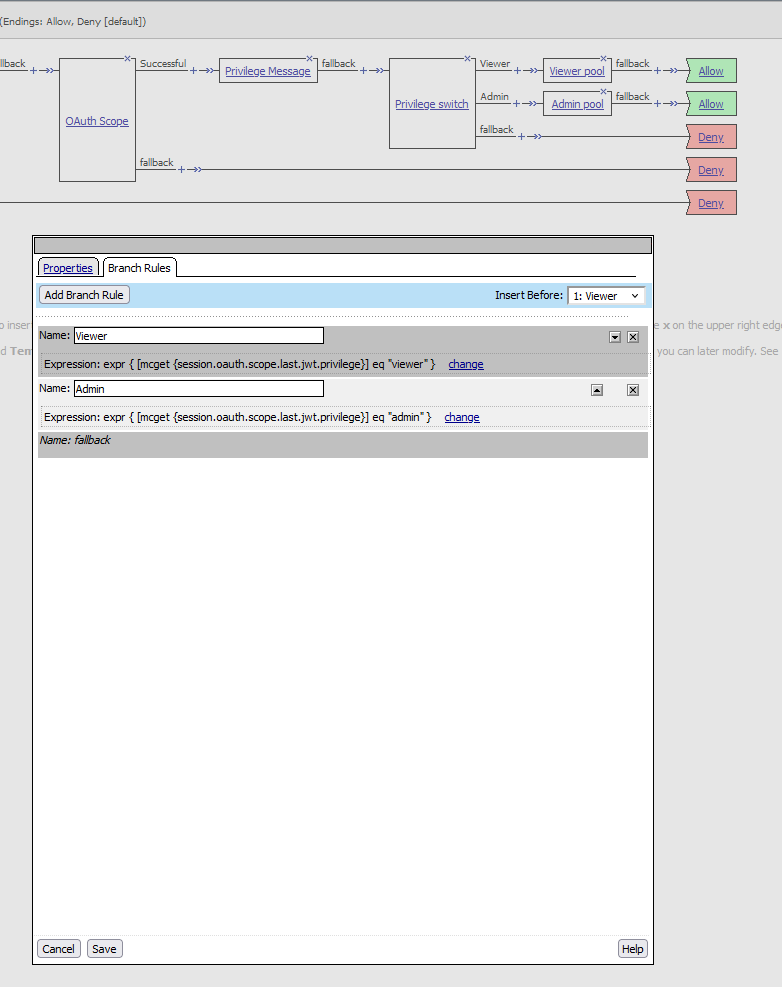
Assign Pools
- Assign the viewer pool to the viewer branch.
- Assign the admin pool to the admin branch.
Allow Access
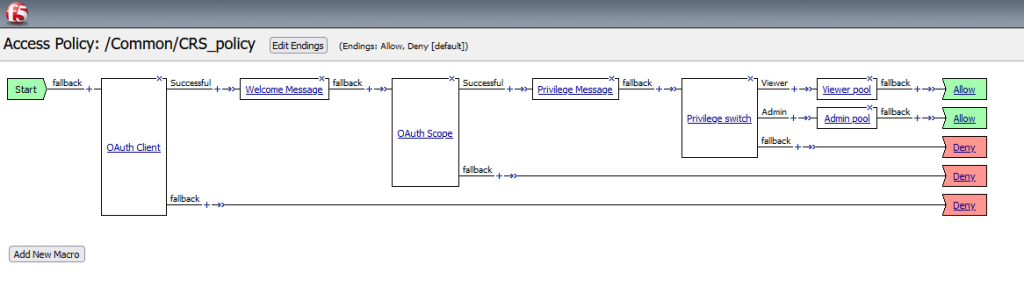
- Modify the ending for all branches to Allow.
The overall policy should match the following screenshot :
Connect to the Viewer VM and authenticate using the Kevin user credentials. Upon successful login, you will see the privilege displayed as “viewer”, and the user will be redirected to the viewer pool, which is the green web server.
If you authenticate with the Nicolas user credentials, the privilege displayed will be “admin”, and the user will be redirected to the admin pool, which is the red web server.

Good post! We will be linking to this particularly great post on our site. Keep up the great writing